using the Sony DCR-PC7/E compiled by Tamara Koyn, February 1998 | ||||||||
| DISCLAIMER: THE AUTHOR(S) MAKE NO WARRANTIES OR REPRESENTATIONS AND ASSUMES NO LIABILITY CONCERNING THE VALIDITY OF ANY ADVICE, OPINION, OR RECOMMENDATION EXPRESSED IN THE MATERIAL. ALL INDIVIDUALS RELYING UPON THE MATERIAL DO SO AT THEIR OWN RISK. | ||||||||
This information has been made possible by the following participants who answered my questions in a post I made to the rec.skydiving usenet newsgroup in February 1998. There is also information included from various vendors/manufacturers and the references listed at the end of this document. This information may contain errors and does not include important details. Clay Bonavito (spyinsky@aol.com) has made around 5,000 jumps in his 15 years of skydiving with the last 6 years at Bay Area Skydiving in Byron, CA. He owns the video concession, Spy In The Sky Video which he calls Spy Video and has anywhere from 4 to 7 camera flyers working with him. He also owns a rigging loft, named Spy Rigging. He shoots Video for AFF and tandems and does rigging full time. He has around 2,500 camera jumps. He is currently learning freefly techniques. Brad Chatellier (brad@madstyle.com) started jumping in October 1993 and now has 2,000+ jumps, 1,600+ freefly jumps. He started freeflying with his partner Tim in early 1994 and won his first medal, a gold medal while flying camera for Tim, at the 1996 Perris Valley Challenge Cup. Their freefly team (Brad, Tim, and Evan) started in late 1995, adopting the name "Mad Style" in the summer of 1996. They competed on the 1997 ESPN Pro Tour taking 3rd place at the stops in Ampfing and Charmey. Tim Miller (onsite@netaxs.com) jumps at Cross Keys in NJ and has around 300 freefly jumps, around 100 with camera. He started jumping 3 1/2 years ago and freeflying about two years ago (but really got into it last year). Along with his other similarly experienced sky mates, he offers to go with people, who are just starting, to film them and give them some help. A big part of this is for safety. People who are just starting out have a tendency to scoot all over the place. For his professional life, he works for SAP America, a software company. Jamie Paul (jpaul@qni.com), at 32 years old, has 2,200 camera jumps (3,300 total jumps). He is a professional portrait photographer, former World Champion camera flyer, and 2 time Emmy Award winner. | ||||||||
This material assumes that you are an efficient, experienced, and knowledgeable skydiver and freeflyer. Freefly with camera gear only when you are completely confident in your freeflying skills. You should have your basic skills down and your emergency procedures should be habits. Basic skills include your ability to hold the basic flying stances as well as control proximity and fallrate in both the headup and head-down positions. Performing an emergency roll should be habitual so that there are no chances that you will cork up into your group. For shopping mall bounces, you should be relaxed enabling yourself and your mates to gently push one another away. There are no black and white rules as every jump with video is unique and individuals differ from one another. As you begin to video, start with simple jumps before attempting more complex jumps and camera flying tasks. Observe other experienced camera flyers and note their gear and mounts. Ask questions. Take your time and think everything out. General skydiving safety considerations should always be followed. Be prepared for the unexpected and keep in mind that putting a camera helmet on your head adds risk and complexity to the skydive. | ||||||||
A good camera has mechanical image stabilization, manual focus, some control over the exposure modes, and readily accessible controls. A good helmet design will leave those controls readily accessible. If the controls are not readily accessible, it may become difficult to adjust the camera as conditions change (often on the way to altitude) as well as switching to standby and record modes as needed. This article obviously will focus on using the Sony DCR-PC7. Sony's new DCR-PC10 looks the same as the DCR-PC7. The DCR-PC10 may replace the DCR-PC7 on Sony's product line. Rumor has it that the DCR-PC7 is discontinued.
In looking for your PC7 or PC10, check prices at Camera World at Oregon, B&H Photography, or the SuperVideo web site. Also, check in the back of video and photography magazines. Prices in Japan and Indonesia are reported to be cheaper than in the US. So, if you have friends in these areas or visiting these areas, check with them. Once you get your PC7, read the owner's manual carefully. Using the camera should be second nature to you so you can concentrate on your skydiving and video. Create a cheat sheet. Clay does find that a good Hi8 gives a brighter picture in low light than the PC7. | ||||||||
Standard lenses are too narrow for skydiving and head shake is more noticeable. So, you will want to buy a wide angle lens for your PC7. The Sony DCR-PC7's receptacle will accept 37mm lenses. Brad of team MadStyle added a .45 made by Hama of Germany. It is a very wide angle lens, with just a little bit of curvature (semi-fisheye). Along the rim of the lens is printed: Hama Video Objektiv HR 0,45 HTMC Compact (1). After some research, a St. Louis area vendor reported that Hama is no longer in business. Brad notes that most .42's will work fine, although you have to zoom in a little bit to eliminate the vignetting. Tim will apply gaffers tape over the zoom control, otherwise, it tends to get caught on his mount and zoom in all of the way. Clay indicates that the best lens size is the .5 because you don't have to deal with the telephoto. While Brad's Hama is wider, .5's are considered to be pretty wide. You may get a bit of vignetting if you use a filter or a polarizer. Tim observes that Kenko lenses don't need an adapter like many other lenses do. Kenko lenses fit directly to the camera. Tim knows people who do really enjoy them. There is a generalization that the quality of the wide angle lens suffers as the price goes down. Lower cost lenses frequently suffer from more shake and debris of a poorly sealed lens. Clay notes that the lower cost lens can sometimes not give you the quality that the more expensive lens can give you, but if they fog up then what good are they. Believe it or not, some of the less expensive lens are better at not fogging up. Kenko lenses seem to be the easiest to find. Clay bought his last lens at Keeble and Schuchat in Palo Alto CA. If you don't have any luck finding the best vendor, buy a Photo or Video magazine (Popular Photography, for example) and try some of the ads in the back. When I asked, he indicated that the ProMaster lens also seems to work well. Clay has had good luck with most of the small lenses. (BTW, no one mentioned any lenses to stay away from.) Tim notes that the cheaper lenses ($40-60) seem to be smaller. The nicer lenses cost more and tend to be bigger and heavy. The .42 offered to Tim with his camera was the size of your fist! He settled for a cheaper lens, smaller in size. You're best off getting a 0.5 and 0.42 (0.45 if you can find one). When you fly with students, the .5 lets you fly further away while still getting a good shot. Tim sometimes flies with a 0.6, depending on the student, particularly if the student is scooting across the sky a lot making a chase dive. For prices on the lenses, check with B&H or with Cameraworld of Oregon. Kenkos run between $40 and $50 mail-order. If you can, Tim suggests to buy your lens when you buy the camera to get the best deal. Clay uses a polarizer (Tiffen brand) because it helps bring out the colors and makes them a little more brilliant. He purchased it from Reeds camera in Walnut creek CA. Tim reads from the filter for his stills camera: "Eliminates unwanted reflections and glare from surfaces like water, metal, and windows. Will significantly darken a blue sky and enrich overall color and contrast through deeper saturation. Turning the filter in its mount will allow you to achieve different affects." Supposedly, when a polarizer is termed to be circular, it means that one doesn't have to ensure that the direction of the filter is facing in the optimal direction when attached to the lens. Tim has been told that the circular filter is used with SLR cameras that have autofocus (like the canon rebel G). This is because of the way the light shines through the lens and the autofocus uses this light to focus. If the light is polarized, it doesn't work properly. However, not everyone feels that a polarizer is necessary. Tim feels a polarizer is just another piece of gear to get caught on your risers! In general, a number of PC7 owners have reported that they have few problems with lenses fogging up. Regarding moisture issues, Tim hasn't had any problems. Like other cameras, the PC7 fogs up going through clouds. Clears up with no special requirements. He's jumped through rain, high-humidity situations, sleet, and freezing rain and the camera worked great. However, this is another reason to be liberal with the gaffers tape! (Using gaffers tape is explained later.) In higher humidity conditions such as those that can occur in Florida, there are any number of strategies you can take if you run into problems with fogging. Camera flyers in CA only have to deal with it a few months out of the year. In the Mid-West, Jamie doesn't have to use anti-fog often. Consider using an anti-fog and lens cleaner. For a wide-angle lens that can be easily removed, defog both the inside and outside of the lens. While on the plane, you'll have to hold your camera properly. If you are getting fog between the lens elements, you need to keep your lens cooler (near a draft) on the way to altitude. If you are getting fog on the outside of the lens, keep it warm (holding it close to your body) on the way up. Fogging between the lens elements can be difficult to totally eliminate. Fogging between the elements (if it's happening) usually happens from exit and may improve during the skydive. Fogging on the outside of the lens usually happens on the lower end of the dive usually at the altitude of the base of the clouds. It's triggered by the warmer air. If fogging is occurring between the lens elements, there will be a fog spot or rather a small circle of fog in the center of the frame. If it's on the outside, it will cover the entire lens. Try using a camera helmet with a box type enclosure for the camera. | ||||||||
Brad observed lots of drop outs when using Panasonic video tapes. Team MadStyle uses only Sony tapes. Clay noted that other brands have a really weird drop out. Tim agrees that video tapes are very important and you should only use Sony high grade. Tim knows some people that use other tapes without any problems, but why risk it? You don't go through tapes THAT quickly (unless you're getting paid for it!). Clay feels that you don't need to pay more for the ones with the computer chip which you don't need. The ME on a tape means that it's a Metal Evaporative type--this doesn't have any thing to do with the computer chip. ME tapes are very expensive--stay away from them if possible. Tim suggests to buy an extra 5 pack when you get your camera. Also, the camera doesn't come with a tape so make sure you get at least one when you buy the camera! They will last a long time especially if you record on the long-play mode which offers the same video quality, but you lose the extra CD-quality recording space (you can record two 16-bit sound tracks on normal speed but you probably won't need to use this). The DCR-PC7 manual cautions to use long play only with Sony tapes and when using long play, the tape may not play back reliably in other PC7 units other than the one on which it was recorded. Rumor has it that prices are coming down since the release of 120 minute tapes (more like $16 for a 60 minute). For durability, Brad will stick with the 60 minute tape. As far as Tim knows, you still have to buy them retail. Clay purchases his tapes at the Good Guys or some similar big outlet store. $12.00 to $15.00 at the most. When shopping for tapes, look through the back of popular photography and call the advertisers to find the cheapest tapes. Make sure they're the 60 minute tapes, not the 30's nor the 120's. | ||||||||
Camera helmets have several options. You can get a full faced helmet or an open face helmet. You will also want to consider whether or not to put the camera in a housing. You can prepare your own helmet from scratch, purchase a mount and helmet and assemble them, or purchase a complete setup. In some locations and competitions, a full face helmet is required for filming skysurfing. This is for your safety as that board comes past you very close very quickly and can easily strike you. A box housing provides protection for the camera as well as reduced vibration and wind noise. The windflow can find even the tiniest hole in your camera. Digital camera systems do not suffer from tape flutter problems but wind sneaking in could still damage its electronic components. A disadvantage to the housing is that it makes access to the camcorder's controls more difficult. Camera helmets can also be a platform style helmet (or have a platform attached). Most freeflyers don't use them. A flat platform on top is useful for mounting all sorts of stuff like still cameras and more. First, putting together your own helmet will be discussed and then options for complete systems will be presented. If you are not comfortable with building your own, let someone who is experienced do it for you. Knowing the considerations for building a helmet will help you know what to look for in a complete setup from a vendor. First, choose a suitable helmet. Many freeflyers choose Gath helmets. A number of rumors about Gath helmets are afloat. Some say Gath is no longer in business. Others say that Gath only stopped production while they retooled for their new helmets and now they are back in production. Yet, others say that the production of the Gath helmet has changed hands. Check with the major vendors for Gath helmets such as Square One, PD Source, or Sunshine Factory. 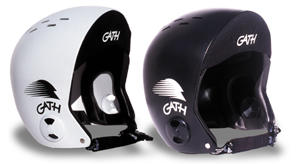 Gath Helmet BoneHead Composite builds the Mind Warp freefly helmet. After receiving a size that fits reasonably well, you follow simple instructions which involve placing the helmet in the oven with the mildest temperature settings to soften it up and then shape it to your head. There is an additional strap that tightens it around your head in addition to the chin strap. This allows you to customize this helmet to fit your head perfectly. Freeflyers claim that the Mind Warp fits very securely on the head and provides more protection than a Gath. Either 1 or 2 audible altimeter pockets can be ordered. 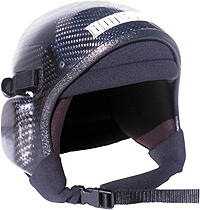
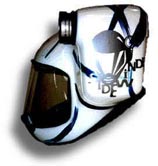
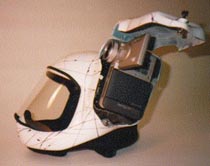
BoneHead MindWarp Helmet There are many helmets to choose from such as even a Protec. You might even look at skiing and climbing helmets. At the 1997 Freefly Festival held at Skydive Arizona, a French freeflyer had his PC7 mounted to a regular leather "frap" hat. SkySystems Ltd. plans to release a freefly helmet built for head-down flying called The Nvertigo. Regardless of the helmet you choose (or build), it should be suitable for camera flying. Because the PC7 mounts to the side of the helmet, a helmet with a thinner shell will allow the camera to be physically closer to your head. A good helmet should fit snugly and allow you the greatest field of vision possible. A good helmet will allow maximum backward movement of your head and maximum range of movement for your head. If you already have a helmet that doesn't fit well. You can adjust the fit by adding or taking away some of the inside padding. One of Tim's Sky Mates shoved and tapped in extra padding inside his Gath to make it fit. Once your helmet is selected and ready, you can either purchase a commercially available mount or build your own mount. Typically, the PC7 is mounted on the side of the helmet with the cassette door and zoom controls facing the helmet. This puts the camera on the left side of the helmet. Ideally, there should be nowhere for lines to go between the camera and helmet from underneath. The mount will have to position the camera such that the horizon will be level in the viewfinder when you are holding your head straight. Brad believes in a zero degree mounting angle (neither upward nor downward) and that the camera flyer should learn to move his neck to point the camera up or down. Also, the camera should be at 0/360 with regard to the head, and not pointed inward at all as this is inconvenient even if it's pointed inward 1 or 2 degrees. Some freeflyers setup their helmets with the camera upside-down as well. This allows for producing normal upright video images while enjoying all the possible mobility available of the head-down flying stance. Sometimes the camera is moved to the right side of the helmet and with other mounts the camera is simply flipped 180 degrees and reinserted with the battery pack facing the helmet. If you know something about how a mount is made, you'll be able to make your own, supervise the making of your own, or know what to look for in a commercially available one. Clay's procedure is simple. Find a piece of aluminum, .060, make it the same size as the camcorder, bend the bottom part 90 degrees, and drill the hole for the mount. Be sure to line it with cork and make a strap to hold the camera. Temporarily attach the piece of aluminum to the left side of the helmet with tape. Put the helmet on with the PC7 in the mount. Have someone help you sight it, mark your helmet with your desired upward or downward angle. Next, drill the holes to mount it to the helmet. Clay uses one hole at the top and one hole at the bottom so the angle is adjustable. You could mount it with four holes one at each corner of the mount. You won't be able to adjust it but it will be secure. Make a mark on your goggles for your sight. If you are ordering a Mind Warp helmet from BoneHead Composite, you can also order a PC7 attachment which they will put on for you. (Bonehead Composite have helmets available with top or side mount video platforms.) The user can adjust the camera mount so that the camera can point in any desired angle. The camera can be inserted in the mount upright or upside-down. Hanson Helmets offers a PC7 mount as well. You send Craig Hanson your properly fitting helmet and he will put on your mount. (Tim feels that Gath helmets are best.) Craig will work with you. The PC7 can be placed in the mount upright (when you're sit flying) or upside-down (when flying head-down). In the upright configuration, you have a choice of +10, +5, 0, -5, and -10 degree angles. For the upside-down configuration, you have a choice of 0, -5, and -10 degrees. Start flying with it at 0 degrees and then adjust it according to how you feel. Usually the positive angles (+10 or +15) are used by belly flyers. Tim flies his Hanson mount at 0 degrees and observes that some freeflyers like it with a slight negative angle. Tim tends to fly as much standup as head-down and finds it to be more difficult to aim a negative angle while upright. The Sidewinder Sport Series™ from SkySystems is a bolt-on camera housing for the Sony PC7, PC10, and JVC GR-DVX digital cameras which can be used with any helmet. It can be mounted upside-down to the right side of the helmet. It can be conveniently moved from one helmet to another at any time. It is made with Carbon Fire Platinum technology and is lightweight, weatherproof, and protective. It provides simple, line of sight, hands free operation. Mount it your way to any helmet or surface with two 1/8" holes. From TNT Systems, the price is $220 US + shipping. The product includes a mounting base plate with cover, wide angle lens protector, and 2 1/8 inch screws. Kevin P. Mulrenin in Massachusetts will be making a side mount system for the PC7. He will just simply send you the mount for your money and you attach it yourself. Complete helmet systems are commercially available. You can order a complete setup from BoneHead Composite as described previously. SkySystems Ltd makes the SideWinder camera helmet designed to specifically hold the DCR-PC7 video camcorder. A full review article on the SideWinder appears in the September 1997 issue of Skydiving Magazine (#194).
If you are not getting a custom design on the helmet, TnT Systems recommends a white helmet over a black one since black will show dirt more easily and white will look nicer if you are seen on someone else's video. The SideWinder protects the DCR-PC7 completely. Most wide angle lenses should fit, however, TNT has found that it is possible to increase the opening size with a rasp and/or sandpaper, if necessary. The 30 minute batteries must be used with the SideWinder as the 60 minute batteries are too bulky to fit in the housing. While other freefly camera helmets allow users to adjust the angle of the camera, the orientation of the camera in the SideWinder is fixed to compensate for it's location. Every helmet/head configuration is slightly different, so you do have to sight it based on how your head wears the helmet. On rec.skydiving usenet newsgroup, users of the SideWinder reported varying camera angles relative to the line of sight from one helmet to the next among different users. This problem was blamed on the fact that the camera is mounted on the side of the helmet. TNT Systems felt that the SideWinder is definitely oriented for belly to earth flying and didn't know of anyone using it for freeflying. It has the same aerodynamic patterns as other Factory Diver designs which are definitely used in head-down flying. You definitely would want to make sure the face lens is secure without any gaps which could catch air. For sighting his SideWinder, Bob Jones (gonejumping@hotmail.com) taped a rectangle of the whole frame at 10 feet. Put all your tape for viewfinders on the inside of the visor. This way it is less likely for it to get rubbed or scraped off. TNT Systems says a mark or dot on the windscreen does the trick here. | ||||||||
Numerous freeflyers ask their Sky Mates if their record light is lit on the front of their camera just before exit. Since the PC7, like most camcorders, shuts off after five minutes in the standby (record-pause) mode, knowing that the power just shut off to the camera is important. You can see if recording stops in the middle of freefall and you may be able to reach back and start it again. Those using video lights have made these types of saves. For a PC-7, a video light is powered by a battery pack instead of the DC power socket. The PC-7 doesn't have a DC out and the video light must use a battery and on/off switch. Brent Finley (skydiver@indirect.com) produces a video light for the PC7 and is available directly from Brent himself, TNT Systems, and other vendors. The standard Brent light shows standby and record mode. Like the original, the version for the PC7 has two lights. However, the standby light indicates that the battery switch is on, not the camera. The light uses two AA batteries, positioned right next to each other. The Brent Light has a transistor circuit that ensures maximum sensitivity with the light sensor. Also, there is a disconnect plug/socket on the sensor so that you can remove the camera from the helmet without untaping or uninstalling the unit--just the sensor remains taped to the camera. | ||||||||
You have several options regarding sighting your camera. Most freeflyers don't use a sight at all. A mark can be placed on the windscreen of a full face helmet or goggles to serve as a reference point. Or, you can get a good ring sight with a valid center point or a frame sight. A ring sight will show you where the center point is. A frame sight can be fabricated with wire to show boundaries of your frame.
If you are alone, you can sight your camera by plugging it in to a TV (with or without a VCR) and referring to the picture. (Of course, you may get some interesting feedback if you aim your camera at the TV! Choose another object and glance at the TV by glancing over with your eyes and not your head.) If you'll not use a sight, do the above sighting procedures anyway to familiarize yourself with your camera's view and to begin programming your muscle memory and your visualization for it. In order to get good results without a ring sight, you'll need experience. Clay says to make sure your helmet fits very well. With a wide angle lens, vertical mounting at zero degrees, and horizontal mounting dead ahead, Brad worked out his sighting procedures by just skydiving with his subject, watching his video, and remembering to train the muscle memory in his neck for the next jump. Before long, sighting will come to you more easily. If he would use a sight, Brad would prefer a frame sight showing his borders so that he could shoot for artistic composition. Tim finds that he doesn't really worry about sighting. After a jump, if he notices something weird, he aims to correct it next time. The super-wide angle lenses help out in this respect! | ||||||||
Use Gaffers tape. Duct tape will leave a sticky residue on your camera. Gaffers tape sticks well to the camera providing a good seal without leaving any residue. Usually, you can find it at a good camera store. There are better grades than others. Generally, the cheaper the Gaffers tape, the lower the quality. Expect to spend about $15. Clay feels that you really don't need to tape a lot down on a PC-7. Just be sure the lens and the cable cover on the bottom is taped closed. Brad tapes around his lens attachment point and around the tape transport mechanism, so that the door is completely closed to dust. Tim Miller feels strongly that the lens should be taped REALLY WELL! Rumor has it that wind getting in between the lens and camera through the attachment can ruin the electronics. The other places that need protection include the "record button mode" switch. (This lets you switch the camera from "Press and hold" recording to "Press and release" recording and "Press and release, record for ten seconds" recording.) Having the switch on the wrong setting will result in a missed dive. Tim also tapes the battery on (even though there's a battery lock), the top of the camera where the swivel screen meets, and across the microphone. You can keep plenty of gaffers tape on hand simply by keeping extra tape stuck on your helmet. If you need to adjust your gaffers tape job during the climb to altitude, you'll be able to do so. Some freeflyers' helmets are entirely covered in gaffers tape! | ||||||||
Clay's Settings... Set your focus on manual by turning off your digital zoom, zoom in all the way and focus on something six feet away. At this point, go back to full wide-angle. Now, you should be focused for infinity. Put a piece of tape on your focus ring. For a nice sunny day, your AE setting should be on Sport. At sunset or on an overcast day, Clay uses the Landscape mode--it helps a lot with the lack of light. Your light settings should all be set to automatic. Your wind indicator as well as your steady shot should be activated. Brad's Settings... Brad turns his steady shot off as he finds that it doesn't really do anything unless you're zooming in, and he shoots zoomed all the way back. Steady shot just increases likelihood of vignetting. Brad also uses the Sport shutter setting (unless it's sunset load in which case he uses Auto). It does impact the color a little bit, but it makes the picture more stable looking and crisper, and is less likely to pick up any dust you may have on your lens (in auto setting, it's much more likely to show any grains of dirt or dust). Brad also uses manual focus. Focus the camera a little bit back from infinity on manual (infinity is the mountain symbol, if you come a little further back it gives you the manual hand symbol). There's no need to refocus it unless the battery was taken off the camera. When you recharge between loads, recharge the battery while it is on the camera. Tim's Settings... When getting the camera ready for the day, Tim just lets it autofocus on something far away and presses the manual focus button. It will stay on the infinity setting all day. Tim finds that Automatic works great, but he usually puts it on Sports mode during the day. On the last jump, he switches to Sunset/Moon. Although he can't tell much of a difference between sunset/moon setting and other settings. | ||||||||
Develop a routine that is uniquely yours. Everyone has their own procedures, some more efficient than others. Bring all supplies you may need to the DZ. These include extra batteries, gaffers tape, an extra tripod screw, battery charger, A/C adapter, extra tally light, anti-fog for your lenses, user manual for the camcorder, video tapes, lens tissue or cloth, etc. Make a checklist for yourself. Prepare your helmet for jumping. Establish your sighting. Set your camera settings (probably Sport) and manual focus at the start of the day. The camera will remember your settings for the rest of the day (or until you want to change them) as long as you don't remove the battery. Check your battery level. Finish off your gaffers tape job. Dirt Dive with your group prior to loading. Plan the exit, freefall positions, and break-off. Check lenses for spots during the climb to altitude. If you find spots, breathe on the lens and wipe with a lens tissue or lens cloth. Tim warns to check the "Auto Exposure" lock. This little button is easily pressed and obviously will ruin the recording. Other than that, his group often watches the last jump on the ride to altitude on the viewscreen. He turns on the camera before the door opens, looks through the viewfinder for anything strange (AE Lock, for instance), puts on his helmet, and presses record when the group before his is about to leave. Brad turns the camera on when the flaps come down and presses the record button as he is climbing out (so as to not waste expensive tape). To switch to standby, just feel the notch with your finger. One click is all you need. If you're not sure if you've gone one or two, go back to OFF (move the switch without pushing down on the green button and it will snap back to OFF and lock there), then proceed from the beginning again, one click. During deployment, PC7 camera flyers use a variety of different techniques. In one technique, you turn your head looking to one side putting the camera forward so that there is no chance that the risers could damage or catch on the camera nor lens. If the camera is on the left side of your helmet, you will look to your right. Keep your shoulders level, however. Other freeflyers reach up, grab the risers upon getting line stretch, and forcefully hold them apart until the canopy opens. Once under a properly flying parachute, Brad simply turns off his camera. After screening the video with his sky mates, Brad backs the tape up to the break-off of the dive--more tape saving techniques. When there will be more than 30 minutes before going back up, he puts the camera on the charger to keep the battery fresh. The Sony batteries can be recharged over and over without developing a memory. The only times Tim has had to recharge his is when he let the batteries sit around for a week or so without recharging them before jumping. BTW, Tim says to remember to get an extra one when buying your camera for a better discount. They only take a little while to charge and last a long time. The "long-life" battery is a little bulky. Another regular battery may leave you just as well off. At up to 16 loads in a day, Brad shoots a whole day on a 60 minute battery, including one review or dub each assuming that he starts the day with a fully charged battery. Simply recharge at the end of the day and you'll be ready for the next day. It's always a good idea to charge incrementally if you've got more than 30 minutes for uninterrupted charging. Clay has observed that the newer the battery, the more videos you get out of it. A 30 minute battery will get you about 4 videos and the 60 minute one will get you about 6 to 7 videos. You should get a lot more then that if you only video the freefall. | ||||||||
Tim suggests, "Just don't fixate on getting the right shot. Fly yourself, transition, go under and over your subjects just like you would normally. Forget about the camera and be a part of the fun! If you keep looking at the rest of the people, your shots will be great, and you'll have more fun." However, others comment, "Fly the camera not your body. Your body will follow." According to some freeflyers, it is this very aspect of camera flying that has really taught them how to freefly so much more effectively than they would have without the camera. For them, the camera is their freefly instructor. There are some basic tips you can follow. Brad looks for the center of the two way (center of mass) even if it's empty space, and backs up enough to keep his subjects well framed. When filming 2-ways (or larger), the camera flyer will need to fly at a greater distance if the 2 subjects are farther apart and at a closer distance when the 2 subjects are flying closer together. After enough failures and successes, you will find yourself suddenly backing up as your group blows apart, and perfectly matching their rate of separation. Because they fly closer to one another, better teams are much much much easier to film. It may be difficult or nearly impossible to make a good video if the subjects are inexperienced and can't fly together. When your subject(s) are on the move, think of intersecting their path instead of chasing them. Videoing freefly students will be the most unpredictable and challenging video you will do. Tim explained that Adrian emphasized the importance to never be higher than other people, especially freefly students. There are numerous techniques left unsaid. As you gain experience you will develop more and more of your own techniques. | ||||||||
The camera can safely go through the X-ray machine at airports. According to information that Brad has received, an X-ray is a visual ray, not a magnetic ray, so it could mess up film that is light sensitive, but not magnetic digital streams on a magnetic tape. Although, Tim will be more careful about letting his tapes go through in the future! | ||||||||
Any camera flyer should check out the following references, additional reading, and Vendors/Manufacturers listed below. References:Flying the Camera; A complete guide to freefall photography and skydiving video (book) by Patrick Weldon The Freefall Cameraman's Manual (book and video tape set) by Skyhi Visual Productions (Denver, Colorado) Sony Digital Video Camera Recorder (Sony DCR-PC7/E User's Manual) Getting Started in Freefall Video Photography by Robbie Culver Skydiving Magazine #198 Jan 1998 Le Ciel en NumÉrique by Patrick Passe PARAmag March 1997 Following is a list of educational materials on video and photography. If there are educational materials that you know about that are not listed below, please E-mail information to Tamara Koyn. Thank you. How to Hard-Wire a Video Indicator Light by Erik Johnson with Breeze Ennis Skydiving Magazine #211 February 1999 Flying the Camera; A complete guide to freefall photography and skydiving video (book) by Patrick Weldon The Freefall Cameraman's Manual (book and video tape set) by Skyhi Visual Productions (Denver, Colorado) Sony Digital Video Camera Recorder (Sony DCR-PC7/E User's Manual) Getting Started in Freefall Video Photography by Robbie Culver Skydiving Magazine #198 January 1998 Letters: Tips on Buying a Video Camera by Shannon Pitcher Skydiving Magazine #191 June 1997 Le Ciel en NumÉrique by Patrick Passe PARAmag March 1997 Filming Tandem Jumps: Tips for the Photographer by Steve Sandstorm Skydiving Magazine #187 Feb 1997 ProtÉgez Vos Droits by Michel Carrio Drop Zone Nov 1996 Apprivoisez Bos Objectifs (photo) by Michel Carrio Drop Zone July 1996 Les Bons Outils (photo) by Michel Carrio Drop Zone May 1996 An Introduction to Photographing Freestyle by Bill Beaver Skydiving Magazine #175 Jan 1996 Proper Equipment Enhances Camera Work by Brian Rogers Skydiving Magazine #171 September 1995 Filming 4-way Exits from a Twin Otter by Brian Rogers Skydiving Magazine #167 May 1995 | ||||||||
Camera World at Oregon 1-800-222-1557 1-800-226-3721 Web Site: http://www.cameraworld.com/ B&H Photography 1-800-947-1185 (212) 239-7500 Web Site: http://www.supervideo.com Keeble and Schuchat Palo Alto CA (415) 327-8996 BoneHead Composite Attn: Chris Frisella 236 East 3rd Street Unit E Perris, CA 92570 USA Tel: 909 943-1166 Fax: (909) 943-3316 SkySystems Ltd. Attn: Troy Widgery Englewood, Colo. E-mail: skysystemsltd.com Web Site: http://www.skysystemsltd.com Hanson Helmets Attn: Craig Hanson 8938 Menkar Road San Diego, CA 92126 (619)578-4208 Brent Finley 4158 E. Agave Rd Phoenix, AZ 85044 E-mail: skydiver@indirect.com TNT Systems Attn: Larry and Ann Trach P.O. Box 1970 Skyland, NC 28776 Office: (704) 883-4447 US Tollfree: (800) 819-0878 Fax: (704) 883-4560 E-mail: tnt@qni.com Web Site: http://www.qni.com/~tnt/ Kevin P. Mulrenin Massachusetts E-mail: skydvr1@tiac.net 508-476-9171 | ||||||||